Capturing beautiful bathroom photos can transform even the simplest spaces into eye-catching visuals. Bathrooms present unique challenges for photographers with their tight spaces and reflective surfaces. The key to stunning bathroom photography is proper lighting and staging. Whether you’re snapping photos for real estate listings, home improvement blogs, or social media, these elements can make your images stand out.

We’ll explore various techniques and tips that are essential for high-quality bathroom photography. From using natural light to arranging decor thoughtfully, these strategies help create appealing and professional photos. By learning how to manipulate light and design elements, we can turn any bathroom into a masterpiece worth sharing.
Stay tuned as we dive into more details about the best practices for bathroom photography. From shooting techniques to post-production tips, we’ve got everything you need to elevate your photography game. Understanding these basics will not only improve your skills but also impress your audience with stunning bathroom images.
Key Takeaways
- Proper lighting and staging are crucial for stunning bathroom photos.
- Thoughtful decor arrangement enhances photo quality.
- Mastering shooting and post-production techniques is essential.
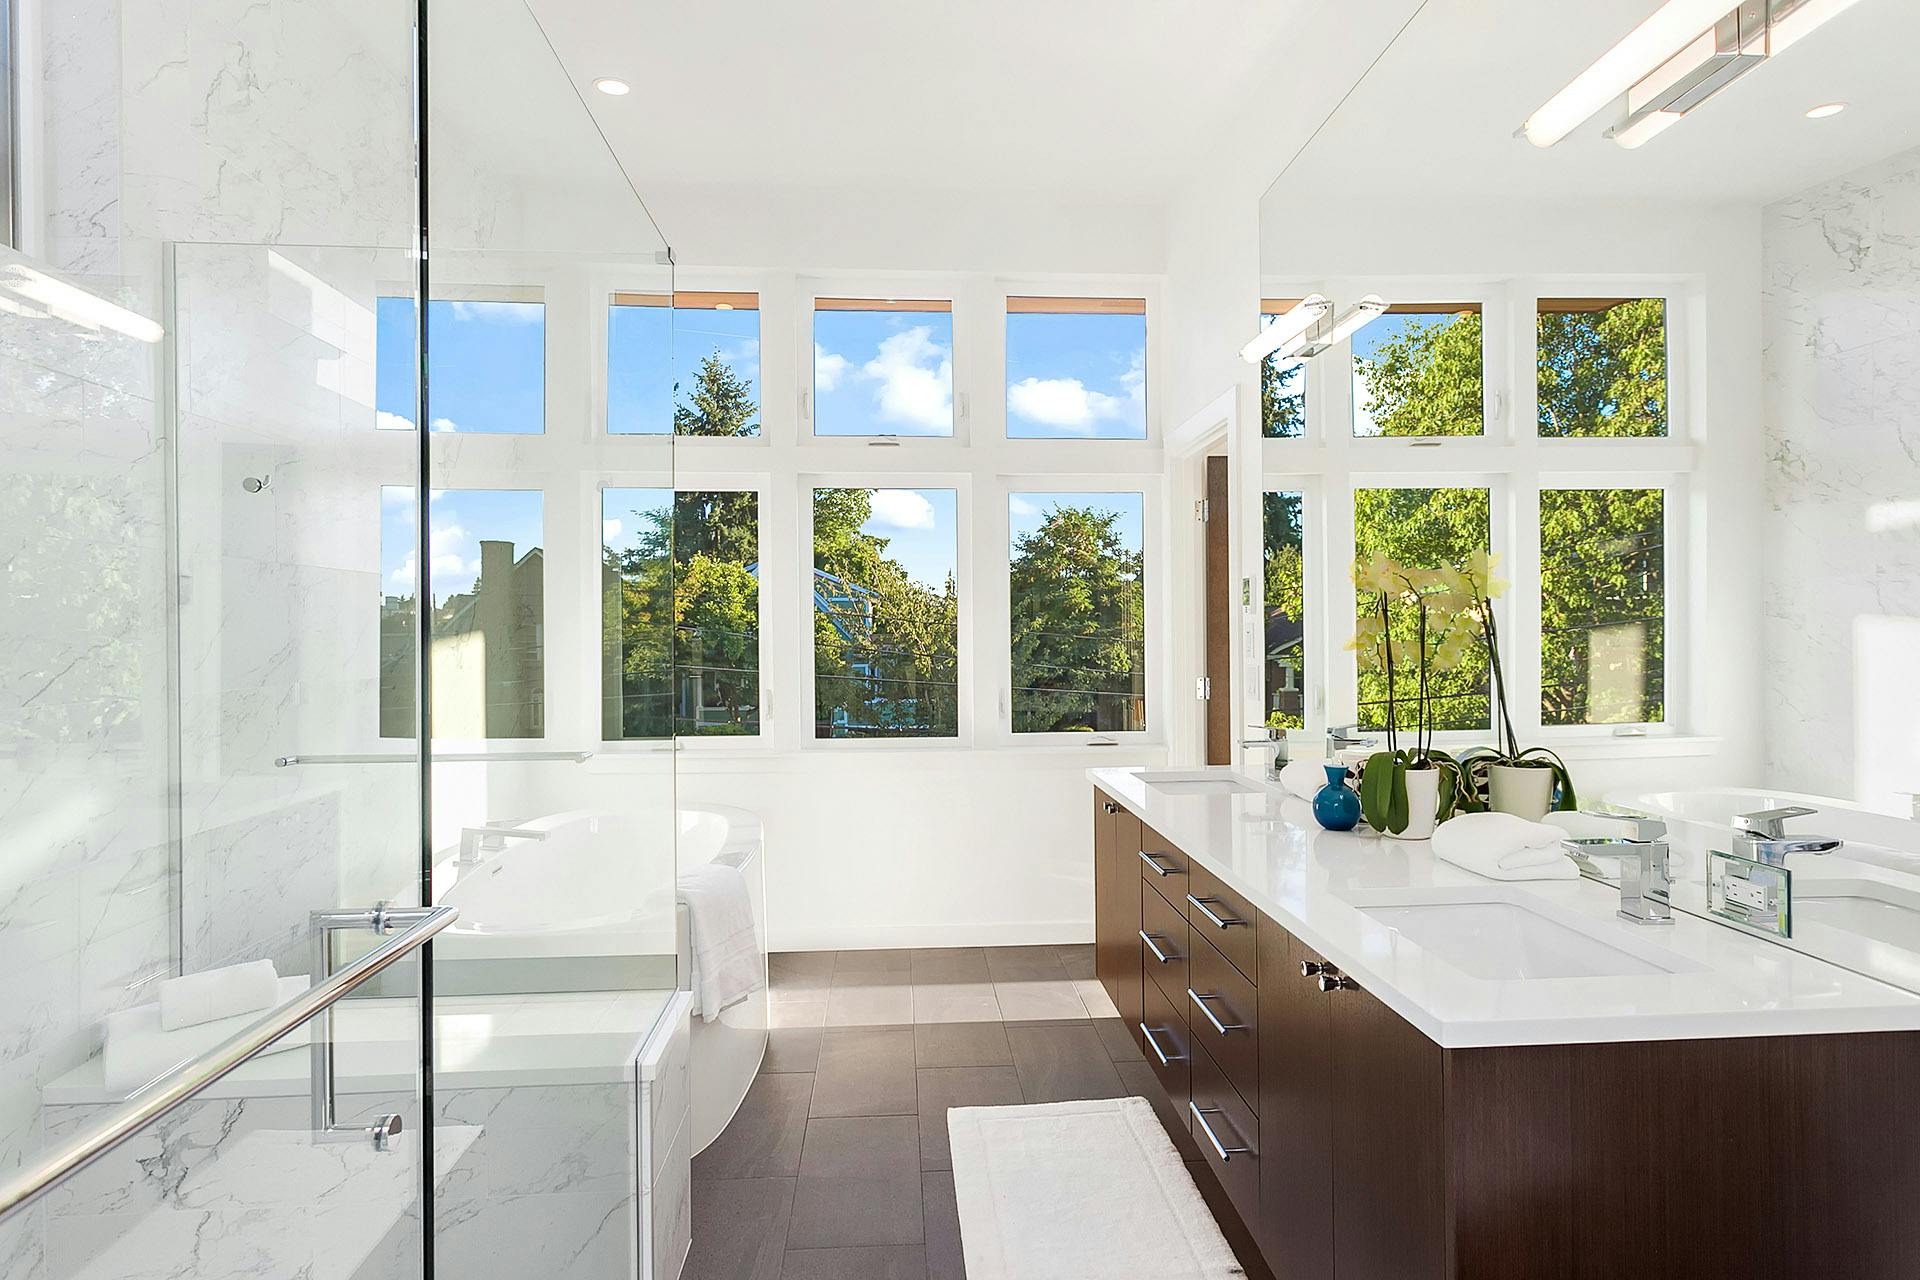
Bathroom Photography Essentials
To master bathroom photography, we need to understand the layout of the space, select the right camera gear, emphasize good lighting, and make effective use of natural light and bathroom fixtures. These elements come together to create visually appealing and professional images.
Understanding Bathroom Layouts
When photographing bathrooms, knowing the layout is key. By understanding the space, we can choose the best angles to capture it. For small bathrooms, consider using a focal length of around 24-35mm. This range allows us to include more of the room in the shot.
Positioning the camera just outside the door can help capture more of the space. Always ensure that any curves, like those of sinks or tubs, are visible to create a natural look in our photos.
Choosing the Right Camera Equipment
Selecting the right camera equipment is crucial. Wide-angle lenses are great for capturing entire rooms, making them essential for bathroom photography. A lens with a 24-35mm focal length works well to show both the space and the details.
Using a tripod can stabilize the camera, especially in low light conditions or when using a narrow aperture. A narrow aperture, like f/11 or higher, helps in getting sharp details throughout the image.
Importance of Lighting
Lighting can make or break a bathroom photo. Proper lighting highlights the features and aesthetics of the bathroom. Soft, diffused light is usually best for indoor spaces to avoid harsh shadows and glare.
Natural light from windows often creates the most flattering and true-to-life images. If natural light is limited, using portable lights can help. Always avoid using overhead lights that are too harsh.
Utilizing Natural Light and Fixtures
Maximizing natural light is one of the best techniques in bathroom photography. Opening windows and doors can flood the space with soft, even light. This type of light helps in avoiding sharp shadows and brings out the natural colors and textures.
Bathroom fixtures, such as mirrors and lights, can also be used creatively. Mirrors can reflect light and add depth to the photographs. Using the bathroom’s own lighting fixtures, like wall sconces, can create a warm and inviting atmosphere in our images.
Preparation for Shooting

When preparing to photograph a bathroom, we focus on cleanliness, decor, and optimal positioning to enhance the space and highlight its best features. This involves thorough cleaning, thoughtful styling, and careful consideration of angles.
Cleaning and Organization
A spotless bathroom is crucial. We start by cleaning mirrors, wiping surfaces, and making sure there is no visible dirt or grime. It’s important to clean every corner, including the shower, sink, and toilet.
Clutter can make a space look smaller. We remove personal items like toothbrushes, toiletries, and bathrobes. We also ensure towels are neatly folded and all toiletries are hidden. This creates an inviting and spacious environment for the photos.
Styling and Bathroom Decor
Styling the bathroom is about creating a welcoming yet elegant space. Small touches, such as neatly folded towels and a stylish soap dispenser, can make a big difference. We often add fresh flowers or a plant to bring a touch of nature.
Choosing a clear color palette helps to avoid a busy look. We match towels and accessories to complement the main color scheme of the bathroom. Less is more in this case; too many items can make the space look cluttered.
Positioning and Angles
The right positioning is essential to capture the bathroom’s best features. We usually place the camera at a height that covers both the floor and ceiling to show the entire space. Experimenting with different angles can also lead to surprising results.
We often shoot from the doorway to get a wide view of the room. Taking shots from different corners can highlight various aspects of the bathroom. Playing with angles helps us find the most flattering perspective.
Shooting Techniques
When photographing bathrooms, different techniques help capture the space effectively. We focus on capturing wide shots, detail shots, close-ups, and using reflective surfaces creatively.
Capturing Wide Shots
To make a bathroom look spacious, we often use a wide angle lens. A focal length of around 24-35mm works well. This lens captures more of the room in a single shot, making it feel larger.
Sometimes, taking a panorama shot can help when the space is particularly tight. By stitching several images together, we can create a wide, sweeping view of the room.
We ensure the bathroom is clean and staged properly before shooting. Towels should be folded, the toilet seat down, and clutter removed.
Detail Shots and Close-Ups
Highlighting specific features requires close-ups and detail shots. For this, we select a narrow aperture, such as f/11, to keep details sharp. Focus on unique fixtures like faucets, tiles, or decor items.
To emphasize these elements, we often use a macro lens or simply zoom in. This approach allows viewers to appreciate the craftsmanship and design choices even in a small space.
We also ensure good lighting, sometimes using a small LED light to remove any shadows, bringing out the textures and colors more vividly.
Using Reflective Surfaces Creatively
Reflective surfaces such as mirrors and tiles can add depth and interest to bathroom photos. We position ourselves to use mirrors to our advantage, capturing reflections that can show more of the room or highlight key features.
Lighting is crucial when working with reflective surfaces. We avoid direct flashes which cause harsh reflections and instead use soft, diffused lighting. This technique reduces glare and highlights the reflective nature of surfaces without overwhelming the image.
Angles are important too. By trying different angles, we can find the most flattering and functional reflection for our shot, creating striking and dynamic photographs that capture the full beauty of the bathroom.
Post-Production Tips
In post-production, we can enhance our bathroom photography by focusing on clarity, contrast, brightness, and saturation. Using the right editing software is crucial for achieving professional results.
Editing for Clarity and Contrast
To make our bathroom photos stand out, we should first address clarity and contrast. Reducing noise and sharpening details can bring out the best in our images. Clarity adjustments help in making textures, like tiles and fixtures, pop.
Contrast adjustments can define light and shadow areas, making the elements in our photo more pronounced. It’s important to strike a balance to maintain a natural look. Adding too much contrast can make images look unnatural.
Using tools like the Curves feature in Photoshop can help us fine-tune these aspects. Curves allow us to adjust the light levels separately, providing more control over the final output.
Adjusting Brightness and Saturation
Correct brightness and saturation levels are vital for bathroom photography post-production. Bathrooms often have uneven lighting, so adjusting brightness can help ensure our images look even and vibrant. Brightening shadowed areas can reveal important details.
Saturation adjustments ensure that colors appear vibrant but still realistic. Over-saturating can result in colors looking fake and unappealing. It’s essential to keep skin tones natural if they appear in the shot.
We might use tools like Lightroom to make these adjustments, ensuring each photo achieves a balanced look. Lightroom offers precise control over highlights, shadows, and overall exposure, perfect for different lighting scenarios in bathrooms.
Choosing the Right Editing Software
Selecting the proper editing software is crucial for effective post-production. Popular choices include Lightroom and Photoshop, each offering a wide range of editing capabilities tailored to our needs.
Lightroom is excellent for batch processing and managing large numbers of photos. It offers extensive tools for adjustments and is user-friendly. Photoshop, on the other hand, provides an in-depth arsenal for detailed edits, like retouching specific areas and using layers to enhance particular elements.
Deciding which software to use depends on our workflow and specific editing needs. Using both can sometimes offer the best results, combining Lightroom’s ease of use with Photoshop’s detailed controls.
Additional Elements to Enhance Bathroom Photos
By carefully adding thoughtful elements like artwork, plants, and candles, we can make bathroom photos more inviting and visually appealing. These elements can add depth, warmth, and character to the space.
Incorporating Artwork and Plants
Incorporating artwork into bathroom photography can add a unique touch and elevate the overall look. We can choose pieces that reflect the style of the bathroom, whether it’s modern, rustic, or elegant. Placing artwork above the bathtub or near the vanity can create a focal point.
Plants can bring a touch of nature and freshness into the bathroom. Small potted plants on the windowsill or shelves are great options. We can also use hanging plants to save space while adding greenery. Both artwork and plants help to break the monotony of tiles and fixtures, making the bathroom feel more like a personal sanctuary.
Adding Elements like Candles for Ambiance
Candles are excellent for creating a cozy and relaxing atmosphere. Strategically placing candles on the edge of the bathtub, around the sink, or on a shelf can enhance the ambiance. We can use scented candles to add another sensory element to the space, making it more inviting.
It’s important to arrange candles in a way that they highlight key areas without cluttering the space. Using candle holders that match the bathroom’s decor can tie the look together. The soft, flickering light from candles can make the bathroom look warm and welcoming in photos, adding an element of comfort and luxury.
Bathroom Remodel Photography

Capturing the beauty and functionality of a bathroom remodel involves focusing on the design ideas, fixtures, and unique features. We aim to highlight everything from intricate details to standout elements like double vanities.
Showcasing Bathroom Designs
When photographing bathroom remodels, it’s essential to show the overall design theme. We capture wide shots to provide a full view of updated layouts and color schemes.
Close-ups are useful for emphasizing textures such as tile patterns and countertop materials. Lighting plays a significant role in photography to bring out the room’s best features. Using natural light where possible enhances the true colors and textures.
Photography of Modern Fixtures and Hardware
Highlighting modern fixtures and hardware gives homeowners a clear view of the latest trends and styles. We focus on capturing high-quality images of popular items such as sleek faucets, minimalist showerheads, and elegant light fixtures.
By incorporating different angles and lighting, we can emphasize the finish and detail of each piece. Including these close-ups helps to show the craftsmanship and design precision that set them apart.
Highlighting Features like Double Vanities
Double vanities are a popular feature in modern bathroom remodels, offering both practicality and style. We take care to photograph these from multiple perspectives.
We highlight unique characteristics such as custom cabinetry, countertop materials, and sink designs. Proper lighting is crucial to showcase the vanity’s functionality and aesthetic appeal. By focusing on the storage solutions and accessory layouts, we can convey the benefits of this feature in everyday use.
Optimizing Bathroom Photography for Social Media
To captivate our social media audience, we need to focus on three key elements: cleanliness, lighting, and composition.
1. Cleanliness:
Before snapping any pictures, we should ensure the bathroom is spotless. This includes wiping down mirrors and glass, ensuring the toilet seat is down, and neatly arranging towels.
2. Lighting:
Natural light is our best friend. Taking photos during the day when natural light illuminates the room can create a warmer, more inviting feel. If natural light isn’t available, using soft white bulbs can mimic natural light effectively.
3. Composition:
We want to avoid taking photos from eye level or too high up. Instead, try capturing the bathroom from just above waist height. This angle prevents the space from looking cramped and creates a more flattering perspective as suggested by Drench.
4. Staging:
Good staging is crucial. We should make sure towels are nicely folded and that no toiletries clutter the counter. A simple, clean look works best. Dreamline Showers recommends setting the scene before taking any shots.
5. Editing:
Even the best photos can benefit from a bit of real estate editing. Adjusting brightness, contrast, and sharpness can enhance our images. Let’s be subtle in our edits to keep things looking natural.
Frequently Asked Questions

In this section, we address common questions related to bathroom photography, including lighting techniques, legal considerations, and creative themes.
How can you effectively light a bathroom for a photographic shoot?
Effective lighting is key. Use natural light when possible, but if the bathroom lacks windows, use soft, diffused artificial light. Position lights to eliminate shadows and highlight key features.
What are the legal considerations for taking photographs in public restrooms?
It’s important to respect privacy and obtain necessary permissions when photographing in public restrooms. Check local regulations and ensure no identifiable individuals are captured without consent.
Can you recommend any creative themes for decorating a bathroom with photography?
Consider themes like aquatic life, botanical prints, or vintage bathroom scenes. Match the theme to the bathroom’s color scheme and decor to create a cohesive look.
What are the best techniques for photographing the small space of a bathroom?
Using a wide-angle lens can capture the entirety of small spaces effectively. Additionally, shoot from waist height to avoid a cramped look, and use mirrors to add depth and dimension.
What type of photography works well for a bathroom’s wall art?
Black and white photography or serene landscapes can add a calming effect. Abstract art and minimalist compositions also work well in maintaining a clean, modern look.
How should one choose and position photographs to complement bathroom decor?
Select photos that match or contrast tastefully with the bathroom’s color palette. Position them at eye level for the best visual impact, and use frames that resist moisture to ensure longevity.
Editor’s note: This post was originally published in September 2017 and has been updated for comprehensiveness.