Phixer
PortfolioAbout Us
Tutorials

Learn how to get the most out of Phixer's editing services.

Blog

Tips, trends, and insights for real estate marketing success.

FAQ

Quick answers to common questions about our services.

Latest Tutorial & Blog

Introduction for Real Estate Photography

Introduction for Real Estate Photography

Hi my name is Alex and I will be taking you through a photographer training tutorial where you learn the principles and techniques of real estate photography. Make sure you have your camera and tripod on hand so you can change settings accordingly and experiment with some of the techniques intermittently as we go through different processes and ideas.<br/><br/><h2>Before we get started on the photography side of the job, we need to do a basic overview of best practices once you arrive at a property.</h2><br/>Firstly, it's important to remember that though there are formulas and rules of real estate photography that you'll be thinking about every shoot, every agent and broker has different preferences and goals, depending on their taste and the distinctive characteristics of the listing. Therefore after you've met the agent and gone through baseline introductions, ask them to give you a tour of the property so they can voice any specific shot ideas,angles are elements of the property they especially want to capture.<br/><br/>This will give you a good sense of their marketing goal and the layout of the house so you can mentally prepare for the forthcoming shoot. Don't hesitate to respectfully raise concerns if agent has a poor shot idea that you know won't work. In these situations you may want to take the shot and show them it's a bad idea rather than trying to describe why. Nonetheless, the ultimate goal is to give the agent what they want, so be compliant and experiment with bizarre ideas if necessary.<br/><br/>Sometimes you may even be surprised. After you've gotten a tour from the agent, start prepping the house for photos. This means turning on all light fixtures and lamps, pulling up blinds and hiding remote controls, Kleenex boxes, sponges and any other items inside that will show poorly in photos and make it difficult on your <a href="https://www.phixer.net/">real estate image retouching company</a>. For staged houses, you probably won't have to move anything out of the way but in properties where the homeowners are still living there, you may have to hide some personal items and declutter a bit. Remember you have a limited amount of time to finish the shoot, so if the house is overly cluttered or unprepared for shooting, ask the agent whether you should reschedule or if they're comfortable shooting the property in its present condition. There's only so much you can do and you're a photographer not a home cleaner/stager.<br/><br/><h2>Do not spend more than 15 minutes prepping the property.</h2><br/>Do what you can within that limit, however moving heavy furniture, decluttering every room, sweeping etc are not your responsibilities. If you have time, avoid including the following items in your shots; bath mats, small carpets or mats on the kitchen floor, modems and bundles of cords, the homeowner's personal photos, toothbrushes, shampoo bottles and personal toiletries in general, trash cans, bedside alarm clocks, home phones, dog beds, litter boxes and anything else that will negatively affect the marketability of the listing. Usually these items can be gently move to the outside of the frame of the photo, then returned once you finish capturing the space. A note on blinds, in general all window blinds should be pulled up there are few exceptions to this rule, so leave the blinds up if;<br/><br/>A. The view outside is really unpleasant, for example there's a dumpster and industrial refinery, a chaotic construction site or anything else that would devalue the listing.<br/><br/>B. If the agent and insists for whatever reason, on leaving them down, you are after all working for them.<br/><br/>And lastly:<br/><br/>C. If the blinds are broken and won't stay level or pull up entirely. Sometimes excessively heavy blinds can be problematic and it's best not to risk pulling them off the wall. Leave the blinds down and twist them open so light can come through the windows. Other notes on prepping the house; make sure you remove security signs from the front yard before taking exterior shots, also hoses should be either coiled or removed from view.<br/><br/>Garage doors should be closed and garbage cans either moved into the garage or out of view. In kitchen's especially, make sure you double check for cabinet under lighting and turn the stove lights on. Dining room and breakfast table chairs should be tucked in even and orderly. Fans, fireplaces, TVs in any other kinetic features of the listing should be turned off. These objects will appear blurry and disorienting once the disparate exposures are fused by your real estate photo retoucher into an HDR composite.

Read More ↗

What's New?

AI Real Estate Photo Editing

AIPhixer AIReal Estate Photo Editing

Instant, professional-quality edits powered by AI technology—perfect for tight deadlines.

Read More ↗
Photo Editing

Professional editing that makes properties shine.

Declutter

Remove unwanted objects for clean, distraction-free images.

Video Editing

Cinematic property tours that captivate and convert buyers.

Virtual Twilight

Convert daytime shots into dramatic dusk photography.

Virtual Staging

Add designer furniture to showcase a property's full potential.

AI Editing New

Lightning-fast edits powered by advanced AI technology.

Lawn Replacement

Transform dull lawns into lush, vibrant green instantly.

AI Website Builder

Build stunning listing websites in minutes, no coding needed.

LoginGet in touch
Phixer

© 2026 Phixer, Inc. All Rights Reserved

Trusted editing partner for real estate professionals since 2009.

Expert editors, proven quality, 24/7 support.

+1 206-934-1858

155 NE 100th St., #309, Seattle WA 98125

support@phixer.net

Community

  • About Us
  • Portfolio
  • Tutorials
  • Blog
  • FAQ

Services

  • Photo Editing
  • Video Editing
  • Virtual Staging
  • Lawn Replacement
  • Declutter
  • Virtual Twilight
  • AI Editing
  • Website Builder

Legal

  • Privacy Policy
  • Terms of Use

Top 13 Real Estate Photography Editing Techniques

January 17, 2018

Top 13 Real Estate Photography Editing Techniques
Real Estate Photography

January 17, 2018

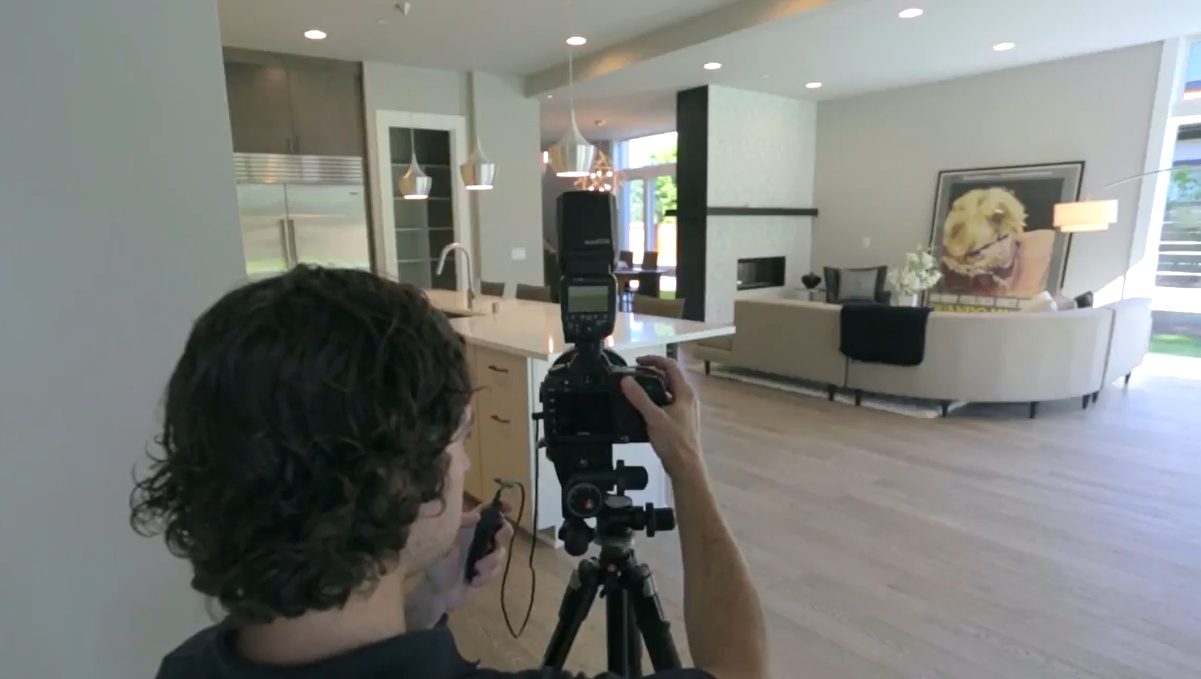
The post-processing for real estate photography takes a good amount of time for many photographers. This usually takes a huge amount of time as this is an important step in creating amazing images that will help clients in selling their property.

There are different techniques that photographers can use and do in order to retouch and make the properties look great in photos.

Here are some of the basic and most commonly used editing techniques for real estate photography:

1. Perform color correcting.

Perform color correcting real estate photo

Color correction is probably one of the basic and essential steps in real estate photo editing. Color correction can be done on Lightroom and Photoshop. However, it’s easier and quicker to do it on Lightroom. With the eyedropper tool, just click on a neutral area to correct the colors of the entire image. Depending on the photo, you might need to adjust the saturation, hue, and tint in order to get a more realistic image.

2. Straighten the lines.

When shooting properties, you need to be extra careful with your lines. You need to make sure that these are straight and not bent in some way. Whether you’re shooting interior or exterior, you have to look at the lines and shoot them properly. However, you can always retouch them after a shoot. To align the lines in Photoshop, you can use the Free Transform. Make sure that you select the entire image and drag the corner of the image opposite to where the lines are leaning towards.

3. Even out the light.

Even out the light.

When shooting interiors or exteriors, you might encounter problems with the shadows and uneven lighting. To combat this, use Lightroom to adjust shadows, highlight, whites, and blacks. Drag the Shadows bar to the right in order to open up the shadows a little bit. Make sure that it is a safe middle ground. If you have harsh highlights on the photo, you may want to drag your highlights bar to the left in order to bring down the hot spots. To adjust the whites and blacks, hold down the Alt key on your PC or the Option key on your Mac. Bring the whites or the blacks bar to the right until you see specs of white or black on the image.

4. Clean up the image with cloning.

cloning photoshop cc

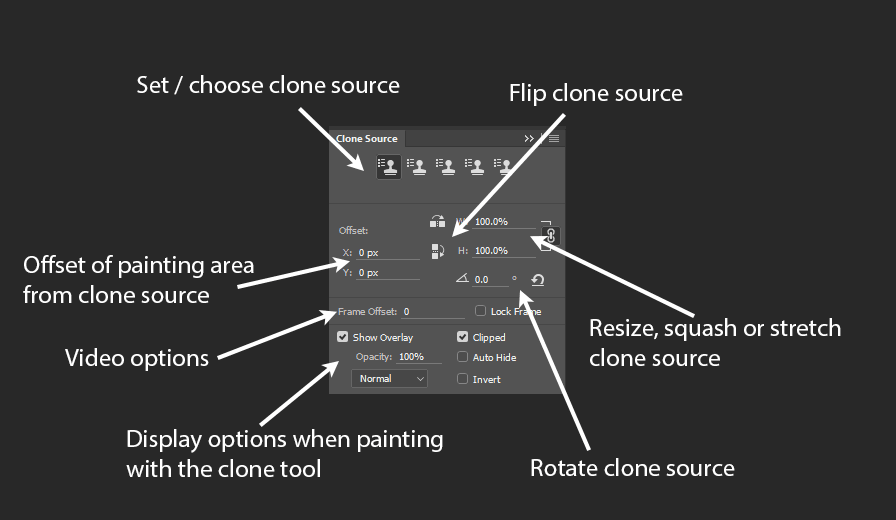
Remove unwanted objects in your photo using the clone stamp tool in Photoshop. Click the clone stamp tool and choose the source area. Then, you can start cloning and painting over the object that you want to remove.

5. Adjust clarity.

On Lightroom, just push the clarity to the right in order to polish the photo. With adjusting the clarity, you might want to adjust the blacks as well in order to add depth and crisper look to the image.

6. HDR.


 High dynamic range (HDR) is a technique that many real estate photographers use to create a greater dynamic range of luminosity. To create HDR images, make sure that you have shot your subject in different bracketed images. Then, all you have to do is merge the photos into one to show its highlights and shadows.

7. Lens correction.

lens correction

This is a handy tool that you can use in Lightroom. It corrects the optical issues found in most lenses. To use this, just go to the Lens Correction module and click Enable Profile Corrections. Then, click on Remove Color Aberration.

8. Curves.

curves brighten histogram

The Curves is a powerful tool in Photoshop. This can be used for color correcting and optimizing your colors. However, it can be an extensive tool that can be challenging to master. To use Curves, go to the Image menu, choose Adjustments and click on Curves. Click Auto in the dialog box. Drag the diagonal line at the center and pull it up to brighten the image or down to darken it. When you’re already happy with the outcome, click OK. You can freely play around with this tool and experiment in order to achieve the look that you want.

9. Using image processor.

The image processor allows you to resize your photos in batches. This is a time-saving tool, especially if you are working on hundreds of images that will have to be used in different mediums. To use the image processor tool, select File menu and click on Image Processor. Choose Folder in the dialog box and save in the same location. Choose JPEG as file type and click on Resize to fit and put in your desired dimensions. Make sure that you include the ICC profile and click Run.

10. Playing with hue and saturation.

 hue and saturation photoshop cc

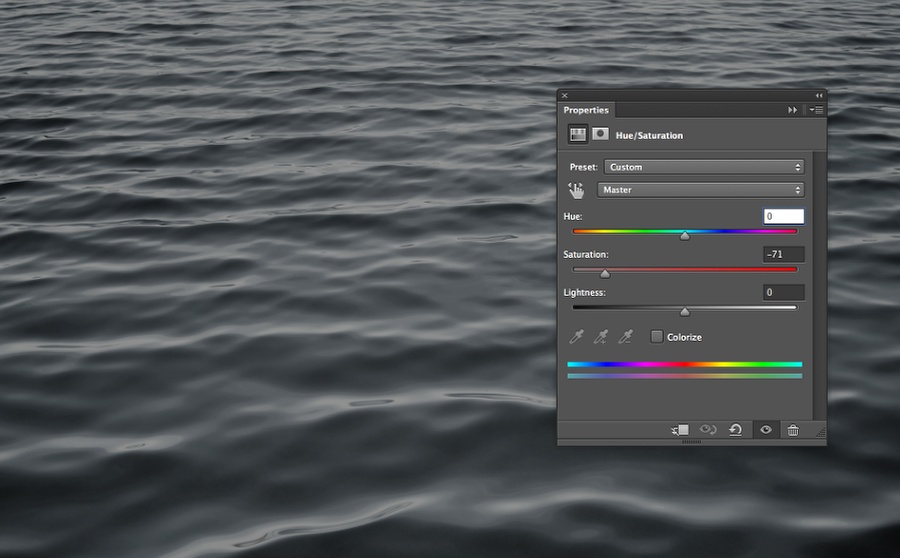
Hue and Saturation is another helpful tool in Photoshop. This can be used for color correction and is also similar to Curves. However, Hue and Saturation can be used to enhance the greens on exterior and landscape photos. To use Hue and Saturation, go to Image menu, choose Adjustments, and click on Hue and Saturation. Choose Yellow from the dialog box. Increase the hue and decrease the saturation and lightness. Change the option from Yellow to Green and repeat the changes you’ve made to hue, saturation, and lightness. Then, click OK.

11. Do composites.

Composite is an ingenious technique that merges different photos to create a seamless image. This can be used in real estate when you’re blending together different images, such as stitching flash and ambient shots into a single photo. This is often done on instances wherein the subject is manually lit by the photographer using a handheld flash.

12. Batch edit, if possible.

If you’re working on similar edits on a number of photos, it’s best to batch edit them using Lightroom. This allows you to save time and do the minor edits all in one go. Just do the retouches and adjustments on one photo and sync these changes into the rest of the images.

13. Keep it natural.

The final yet most important photo editing technique when retouching real estate photos is to keep it natural. It can be too easy to go overboard when editing photos. However, you need to make sure that you create a more natural look in order to make the photos believable. The goal in real estate photography is to sell the property. Make sure that you err on the natural side every time you retouch your images.

Complete Solution

Ready to work with us?

Send us your photos and let our expert real estate photo editors handle the editing — fast, accurate, and ready for publishing.

Contact Sales