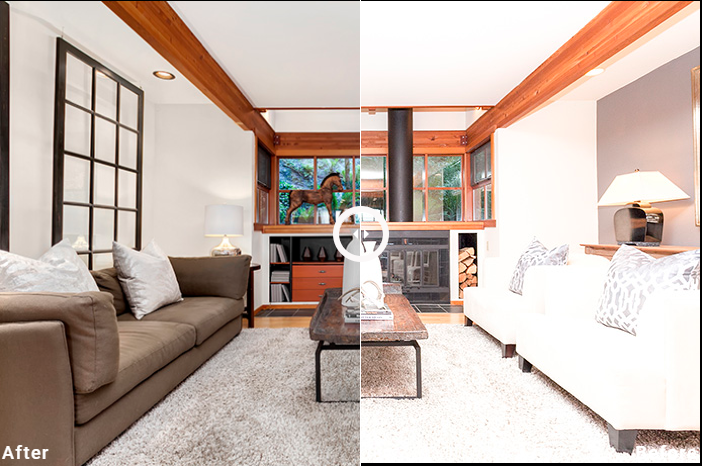
As a newbie real estate photographer, there are more tasks that come after booking your first project. Once you’ve wrapped up your shoot, the real job is just starting. Your goal is to deliver the images as the client wants them. These photos should represent the real estate property accurately and make it appealing to prospective buyers.
In order to achieve this, you need to do post-production editing to improve your images. This will make your photos clearer and have better colors and lighting, depending on the scene. Unlike shooting portraits or events, editing for real estate is a different thing.
The needed software
Having the necessary software is essential to editing your real estate images properly. As a newbie photographer, you need to be familiar with both Adobe Photoshop and Lightroom. These two are the most useful and the most common editing software for all types of photography. Especially for real estate photography, these two are a must.
Aside from these, the Enfuse plugin on the Lightroom is also important for HDR photography. If you’re shooting a lot of interior for your projects, then knowing how to HRD will be indispensable.
The step-by-step process
In editing your real estate photos, follow these steps:

1. Before working on your images, you need to import all of your photos to you desktop and to your Lightroom catalog.
2. Once you have imported your photos, you can start working on them. If you have bracketed shots that you’ve taken for HDR, then it’s time to create a single stack for them. You might have three to seven photos on a stack depending on how many exposures you have taken.
3. Adjust the color temperature on each of your stack using the eye dropper tool. This ensures that each of your bracketed stack has the same color temperature.
4. Blend your bracketed photos through your Enfuse plugin. Highlight your stacks and trigger the Enfuse process. This lets Enfuse blend each stack individually.
5. After successfully blending the stacks, edit the photos in Lightroom. Adjust the exposure, highlights, shadows and other necessary elements of your photos.
6. If you have exterior photos of the property that needs more difficult editing processes, then you might need to use Photoshop. This is usually used for sky replacements or removing objects.
7. Then, you might want to use some presets and adjust the photos accordingly so they have a similar look and feel as the client would want.
8. Once you’ve finished all the necessary edits and you’re quite happy with the results, it’s time to export the photos and package them for delivery.
Some tips and tricks
Aside from the basic editing, there are other factors and tips that you have to keep in mind while going through your images. Here are some tips to remember:
If you are shooting interior with a wide lens, having a sort of line convergence usually cannot be avoided. So, you have to straighten out the lines through your Lightroom’s Lens Correction option under the manual section.
Remember to even out the light during post-production. Lighting is key for every type of photography most especially for real estate photography. This is probably the first thing that you have to check. The goal is to make the image and lighting look natural. To do so, push the exposure slowly so you get a feel if it’s too bright or not.
Cleaning up your images is a must before you hand in the final photos to the client. Do spot removal or cloning if necessary. The spot brush tool removes dust or spots that are in the photo. Clone allows you to remove any reflections or glares. Healing, on the other hand, corrects smaller spots but adds a softer blend to the spots.