Phixer
PortfolioAbout Us
Tutorials

Learn how to get the most out of Phixer's editing services.

Blog

Tips, trends, and insights for real estate marketing success.

FAQ

Quick answers to common questions about our services.

Latest Tutorial & Blog

Introduction for Real Estate Photography

Introduction for Real Estate Photography

Hi my name is Alex and I will be taking you through a photographer training tutorial where you learn the principles and techniques of real estate photography. Make sure you have your camera and tripod on hand so you can change settings accordingly and experiment with some of the techniques intermittently as we go through different processes and ideas.<br/><br/><h2>Before we get started on the photography side of the job, we need to do a basic overview of best practices once you arrive at a property.</h2><br/>Firstly, it's important to remember that though there are formulas and rules of real estate photography that you'll be thinking about every shoot, every agent and broker has different preferences and goals, depending on their taste and the distinctive characteristics of the listing. Therefore after you've met the agent and gone through baseline introductions, ask them to give you a tour of the property so they can voice any specific shot ideas,angles are elements of the property they especially want to capture.<br/><br/>This will give you a good sense of their marketing goal and the layout of the house so you can mentally prepare for the forthcoming shoot. Don't hesitate to respectfully raise concerns if agent has a poor shot idea that you know won't work. In these situations you may want to take the shot and show them it's a bad idea rather than trying to describe why. Nonetheless, the ultimate goal is to give the agent what they want, so be compliant and experiment with bizarre ideas if necessary.<br/><br/>Sometimes you may even be surprised. After you've gotten a tour from the agent, start prepping the house for photos. This means turning on all light fixtures and lamps, pulling up blinds and hiding remote controls, Kleenex boxes, sponges and any other items inside that will show poorly in photos and make it difficult on your <a href="https://www.phixer.net/">real estate image retouching company</a>. For staged houses, you probably won't have to move anything out of the way but in properties where the homeowners are still living there, you may have to hide some personal items and declutter a bit. Remember you have a limited amount of time to finish the shoot, so if the house is overly cluttered or unprepared for shooting, ask the agent whether you should reschedule or if they're comfortable shooting the property in its present condition. There's only so much you can do and you're a photographer not a home cleaner/stager.<br/><br/><h2>Do not spend more than 15 minutes prepping the property.</h2><br/>Do what you can within that limit, however moving heavy furniture, decluttering every room, sweeping etc are not your responsibilities. If you have time, avoid including the following items in your shots; bath mats, small carpets or mats on the kitchen floor, modems and bundles of cords, the homeowner's personal photos, toothbrushes, shampoo bottles and personal toiletries in general, trash cans, bedside alarm clocks, home phones, dog beds, litter boxes and anything else that will negatively affect the marketability of the listing. Usually these items can be gently move to the outside of the frame of the photo, then returned once you finish capturing the space. A note on blinds, in general all window blinds should be pulled up there are few exceptions to this rule, so leave the blinds up if;<br/><br/>A. The view outside is really unpleasant, for example there's a dumpster and industrial refinery, a chaotic construction site or anything else that would devalue the listing.<br/><br/>B. If the agent and insists for whatever reason, on leaving them down, you are after all working for them.<br/><br/>And lastly:<br/><br/>C. If the blinds are broken and won't stay level or pull up entirely. Sometimes excessively heavy blinds can be problematic and it's best not to risk pulling them off the wall. Leave the blinds down and twist them open so light can come through the windows. Other notes on prepping the house; make sure you remove security signs from the front yard before taking exterior shots, also hoses should be either coiled or removed from view.<br/><br/>Garage doors should be closed and garbage cans either moved into the garage or out of view. In kitchen's especially, make sure you double check for cabinet under lighting and turn the stove lights on. Dining room and breakfast table chairs should be tucked in even and orderly. Fans, fireplaces, TVs in any other kinetic features of the listing should be turned off. These objects will appear blurry and disorienting once the disparate exposures are fused by your real estate photo retoucher into an HDR composite.

Read More ↗

What's New?

AI Real Estate Photo Editing

AIPhixer AIReal Estate Photo Editing

Instant, professional-quality edits powered by AI technology—perfect for tight deadlines.

Read More ↗
Photo Editing

Professional editing that makes properties shine.

Declutter

Remove unwanted objects for clean, distraction-free images.

Video Editing

Cinematic property tours that captivate and convert buyers.

Virtual Twilight

Convert daytime shots into dramatic dusk photography.

Virtual Staging

Add designer furniture to showcase a property's full potential.

AI Editing New

Lightning-fast edits powered by advanced AI technology.

Lawn Replacement

Transform dull lawns into lush, vibrant green instantly.

AI Website Builder

Build stunning listing websites in minutes, no coding needed.

LoginGet in touch
Phixer

© 2026 Phixer, Inc. All Rights Reserved

Trusted editing partner for real estate professionals since 2009.

Expert editors, proven quality, 24/7 support.

+1 206-934-1858

155 NE 100th St., #309, Seattle WA 98125

support@phixer.net

Community

  • About Us
  • Portfolio
  • Tutorials
  • Blog
  • FAQ

Services

  • Photo Editing
  • Video Editing
  • Virtual Staging
  • Lawn Replacement
  • Declutter
  • Virtual Twilight
  • AI Editing
  • Website Builder

Legal

  • Privacy Policy
  • Terms of Use

A Complete Step-by-Step Tutorial on Exterior Object Removal

September 30, 2021

A Complete Step-by-Step Tutorial on Exterior Object Removal
Photo Editing, Real Estate Photo Editing

September 30, 2021

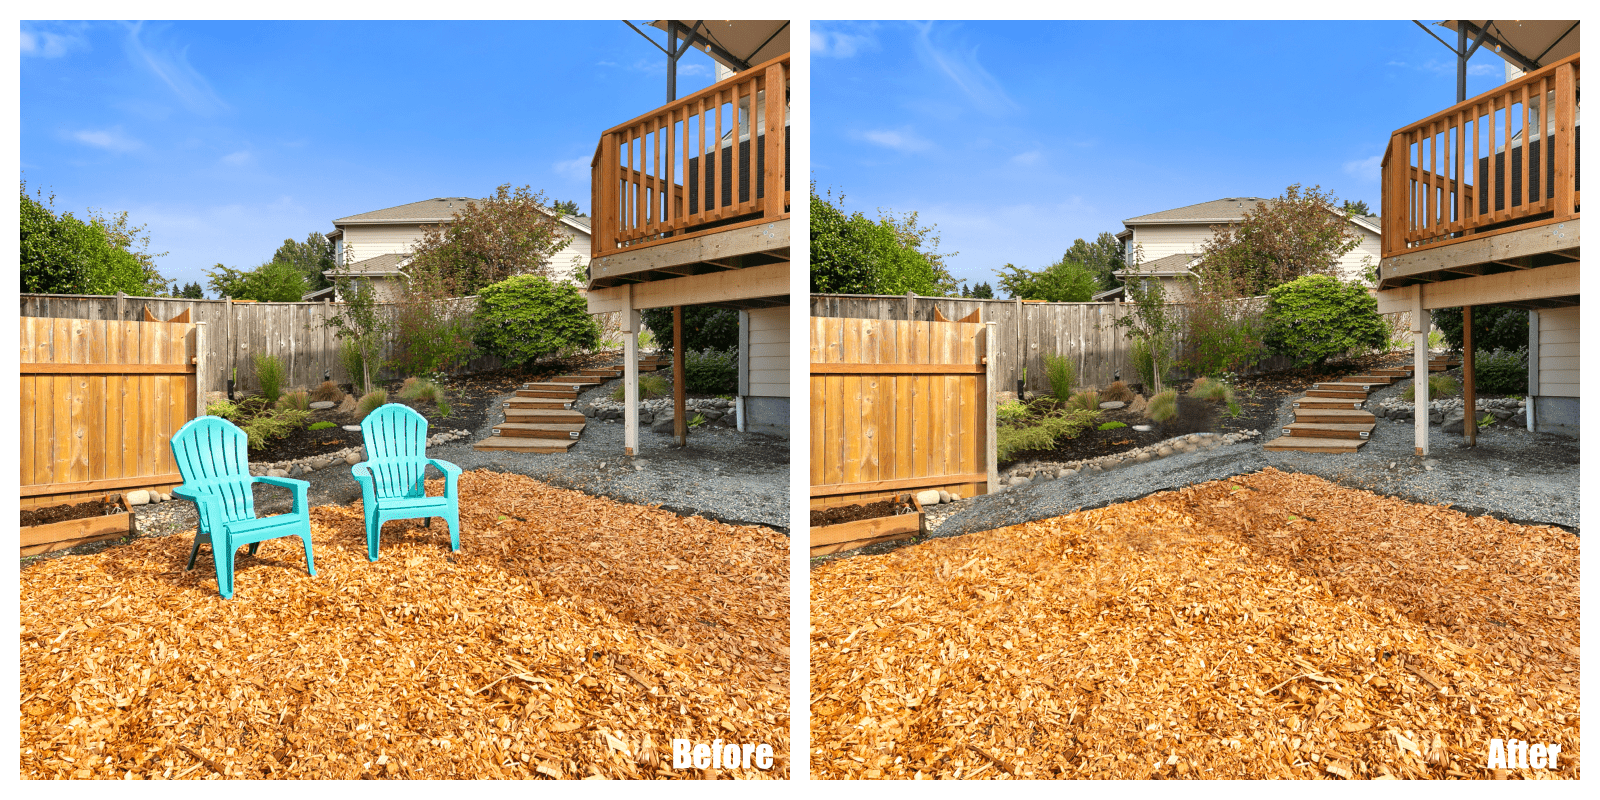
Using a clutter-free photo is vital in real estate photography. A property free of disarray will look bigger and brighter in pictures and leave a lasting and positive impression on potential homebuyers. However, you can’t always declutter before taking photos; it’s best to use professional editing services like Phixer or practice specific techniques in Photoshop to achieve that goal. Both of these techniques are easy to use and effective.

There are different techniques on how to remove objects from a picture using Photoshop. This article will provide step-by-step guides on every process so you can quickly determine which works best for you.

[lwptoc]


TL;DR: Here are some of the techniques for exterior object removals:

Technique #1: Spot Healing Brush

spot healing brush

One unwanted object removal technique available in Photoshop is the use of the spot healing brush. This technique is ideal in removing small objects in a photo, namely socket holes in the walls or visible spots in pieces of furniture.

Step 1: Prepare Your Photo in Photoshop

To learn how to remove objects from a picture with this technique, start by opening your product photo in Photoshop. Open Photoshop and then select the image you want to work on in the software artboard.

Step 2: Generate a New Retouching Layer

Once you insert the photo, the software will automatically create a background primary layer.

Duplicate a new layer on top of the primary background layer to use for retouching.

Step 3: Close in on the Object for Removal

Select the layer you’ve made and zoom on the clutter so that you can plan how to remove it precisely.

Step 4: Choose the Spot Healing Brush Tool

After zooming in on the object that you want to remove from the image or picture, click on the spot healing brush tool available in the left toolbar of Photoshop. This tool is vital to complete the unwanted objects removal process.

Select the appropriate brush size depending on the size of the object you want to remove. If this is your first time using the spot healing brush tool, take the time to play around with different brush sizes so you can discover one that suits the size of the object you want to remove.

Step 5: Target the Object You Want To Remove

Move your brush to the object you want to erase from your photo. With the spot healing brush tool, any unwanted item on your image will magically disappear.

However, for your photos to look realistic and natural even when using this tool, pay careful attention to the size of the brush you’re going to use and the size of the object you want to remove. Using a brush tool that’s too big will likely erase other essential elements in your photo while using one that’s too small will not remove the clutter altogether.

Technique #2: Clone Stamp

The clone stamp Photoshop tool copies an area into another part of the image. Using the clone stamp tool in Photoshop is also a great way to declutter unwanted items in your photo. This technique removes larger objects as you can select an entire area and replace it with another item. It’s good for copying textures and covering up areas of the property that need work.

Step 1: Open Your Photo in Photoshop

After you’ve selected the image you want to edit, select the model photography images in Photoshop. Go to File and then click on Open New image. A window will automatically appear after you select this option. After that, you can navigate to your image, and click Ok to insert it in the artboard.

Step 2: Click on the Clone Stamp

Click on the clone stamp from the tool panel of Photoshop. Then, hold the Alt key and target the area where you want to use as a sample away from the unwanted objects. It should have the appropriate texture and lighting because that part will be copied as it is.

Step 3: Focus on the Object You Want To Remove

Paint over the object you want to remove from your photo or image, and the clone stamp will automatically fill this area with the sample area you selected earlier.

Technique #3: The Patch Tool

photoshop patch tool

You can also use Photoshop to remove objects using the patch tool. This is another handy object-removing tool that works best with solid backgrounds, like black and white.

Step 1: Open Your Photo in Photoshop

After selecting the image you want to edit, create a duplicate layer in Photoshop.

Step 2: Click on the Patch Tool

Move your cursor to the left toolbar and click on the patch tool. Unlike the clone stamp tool, you must choose the area you want to remove first and then select a sample area next.

Step 3: Create a Line Around the Unwanted Object

Zero in on the area you want to remove and draw a line around it. Try your best to draw straight lines around the object to get perfect and natural-looking photos.

Step 4: Drag the Selection to an Area You Want To Use as Patch Sample

After completing drawing lines around the unwanted object, click on the selected area and drag it towards the section you want to use as a patch sample. This will automatically cover the sample area with the selected area.

Save Your Work

You should save your work once you’re done removing the unwanted exterior objects from your photo. You can do this by pressing the control and S keys on your keyboard or manually selecting Save or Save As from the Photoshop File option. Make a habit of saving your work especially when you’re in the middle of a complicated edit.

Key Takeaway

Contrary to popular belief, using Photoshop to remove objects from your photos isn’t impossible to accomplish. As long as you’re willing to learn and exert time and effort, it won’t be long before you can master the art of removing external objects using Photoshop! You can also outsource this service if you have limited time.

Complete Solution

Ready to work with us?

Send us your photos and let our expert real estate photo editors handle the editing — fast, accurate, and ready for publishing.

Contact Sales